If you’re dreaming of turquoise, crystal-clear waters and white sandy beaches, look no further than Grand Cayman Island! This Caribbean paradise is only a short, direct flight from Houston — less than 3 hours away! Whether you’re planning a romantic escape or a family vacation, Grand Cayman has something for everyone.
Grand Cayman is part of the British Overseas Territory of the Cayman Islands, so you’ll notice subtle touches of British charm — from driving on the left side of the road to being greeted at the airport by a portrait of Queen Elizabeth II.
My hubby and I visited grand Cayman for our 10th wedding anniversary. To find out more about our annual retreats, read my blog post “Why Every Couple Needs a Yearly Romantic Getaway” HERE.
Where to Stay on Grand Cayman
Seven Mile Beach is world-famous for a reason. Stretching along the island’s west coast, this stunning beach is consistently ranked among the top beaches in the world for its calm, crystal-clear waters and soft white sand.
We stayed at The Westin Grand Cayman Seven Mile Beach Resort, and it couldn’t have been more perfect. The beach is pristine and calm — ideal for young children or blissful relaxation. It also offers fantastic snorkeling right from shore. We had so much fun searching for “buried treasure” and pretty shells. We even spotted a barracuda gliding past Us!
The resort itself is beautiful, with excellent amenities, beachfront dining, and plenty of lounge chairs shaded by palms and umbrellas. It’s the perfect home base for your Grand Cayman adventure.
Top Things to Do in Grand Cayman
1. Visit Stingray City (Absolute Must!)
No trip to Grand Cayman is complete without visiting Stingray City — a series of shallow sandbars in the North Sound where friendly southern stingrays swim freely.
We booked our tour Captain Marvins Watersports , and we can’t recommend them enough. Their small group tours make for a more personalized experience, and our guides were fantastic — sharing island history, snorkeling tips, and making our stingray encounter unforgettable.
We chose Tour #5: Stingray City, Starfish Point & Snorkel , and it was hands-down the highlight of our trip. We’ll definitely be booking with Captain Marvin again when we return — next time with our kids!
2. Experience the Bioluminescent Bay
Another can’t-miss experience is the Bioluminescent Bay Tour, one of the few places in the world where you can see glowing organisms light up the water around you. It’s a magical, once-in-a-lifetime experience — best enjoyed on a moonless night.
3. Take a Sunset Sail
If you love sunsets (and who doesn’t?), book a Sunset Sail through Red Sail Sports. The crew was friendly, accommodating, and even helped capture some amazing photos for us. Watching the sun dip below the horizon from the water is absolutely breathtaking.
Best Restaurants in Grand Cayman
The Westin Restaurants – Convenient and delicious options, from breakfast to poolside lunches. Their on-site coffee and breakfast bar was a daily favorite. We also enjoyed the Fish Tacos and the Paella Night.
Peppers Bar & Grill – A lively local spot with authentic Caribbean food and island vibes.
Luca Restaurant – Upscale Italian cuisine with a beautiful ocean view and an excellent wine list.
Yoshi Sushi – Located across from The Westin, this restaurant serves fresh, beautifully presented sushi in a unique ground-level seating setting. (Pro tip: make a reservation; it’s popular with both locals and tourists!)
Explore George Town
When you’re ready for a break from the beach, head to George Town, the capital of Grand Cayman. This charming port city is filled with duty-free shopping, local art galleries, and colorful colonial-style buildings.
Fun fact: George Town is one of the Caribbean’s leading financial hubs, yet it still maintains its relaxed island charm with friendly locals and seaside cafés.
Must-Do Next Time (Already Planning Our Return!)
Cayman Turtle Centre (West Bay)
One of the oldest sea turtle conservation centers in the world, the Cayman Turtle Centre offers a once-in-a-lifetime experience. You can swim with green sea turtles, explore the marine lagoon, and learn about conservation efforts to protect these incredible creatures.
Perfect for families — educational, fun, and unforgettable.
Cayman Crystal Caves (Northside)
The Cayman Crystal Caves are a breathtaking natural wonder. You’ll explore three magnificent caves filled with stalactites, stalagmites, and sparkling crystal formations. The guided tour lasts about two hours and offers an adventurous change of pace from the beach.
Grand Cayman Travel Tips
Mind Hurricane Season: The best time to visit Grand Cayman is December through April, when the weather is dry, sunny, and mild. We visited in August (hurricane season) and lucked out with perfect weather.
Protect Yourself from the Sun: The Caribbean sun is strong! Bring UPF shirts, wide-brim hats, and plenty of reef-safe sunscreen — or you might end up buying a $50 sun shirt like we did.
Currency Tips: The island uses the Cayman Islands Dollar (KYD), but U.S. dollars are widely accepted. Most restaurants and taxis accept credit cards; carry a bit of cash for tips or smaller purchases.
Fun Facts About Grand Cayman
Grand Cayman is the largest of the three Cayman Islands in the western Caribbean.
Seven Mile Beach is actually about 6.3 miles long — but who’s counting when it’s this gorgeous?
The island’s flat terrain gives it exceptionally clear turquoise waters — a snorkeler’s dream.
Grand Cayman was once a pirate hideout during the Golden Age of Piracy.
The island is known for being one of the safest destinations in the Caribbean, with friendly locals and a relaxed atmosphere.
Final Thoughts
Grand Cayman truly lives up to its reputation as a tropical paradise. Between the soft sand, turquoise water, incredible food, and unforgettable excursions, it’s a destination you’ll want to return to again and again.
Next time, we’ll be exploring the Turtle Centre, Crystal Caves, and Bioluminescent Bay — but honestly, even another sunset on Seven Mile Beach would be worth the trip alone.
Have you been to Grand Cayman? Share your experience in the comments below, I love to hear from you!
Was this post helpful? I’d love to hear your thoughts! Have you visited Rocky Mountain National Park? What were your favorite hikes, views, or hidden gems? Drop your recommendations in the comments—I can’t wait to hear what made your trip unforgettable!
If you’re looking for a healthy buffalo chicken dip that’s actually good for you — this one’s a keeper. It’s high in protein, low in carbs, and made with light, wholesome ingredients that keep all the creamy, spicy flavor you love without the extra calories!
Whether you’re hosting a game day party, bringing a dish to a potluck, or just want a quick high-protein meal, this dip delivers every time. It’s easy to make, full of flavor, and guaranteed to be a crowd favorite.
Why You’ll Love This Healthy Buffalo Chicken Dip
High in protein, low in fat: Made with nonfat Greek yogurt and low-fat cottage cheese instead of cream cheese and sour cream. My version is just as creamy and guilt-free!
Quick and easy: Just 15 minutes of prep and 20 minutes in the oven.
Versatile: Serve it as an appetizer or turn it into a main dish.
Crowd favorite: Perfect for football parties, holiday gatherings, or meal prep.
This easy buffalo chicken dip recipe is one you’ll come back to over and over again.
How to Serve This Dip
As an Appetizer: Serve it hot and bubbly with:
Celery sticks, carrots, or bell peppers for a low carb appetizer
Crackers, tortilla chips, or toasted baguette slices for a classic crowd favorite
As a Main Dish: Turn this high protein buffalo chicken dip into a meal!
Pile it onto a fresh slice of sour dough for a buffalo chicken sandwich
Wrap it up in a whole wheat tortilla with lettuce and tomato for an easy lunch or dinner
No matter how you serve it, this dip brings big flavor and big satisfaction.
The Star of the Dish
The real star of this recipe is the Primal Kitchen Original Buffalo Sauce. It’s made with clean, simple ingredients — no dairy, no added sugar, and no unnecessary preservatives — yet it delivers that bold, tangy flavor that makes buffalo chicken dip so irresistible. I love that it keeps this recipe wholesome and flavorful without any compromise, and it’s become a staple in my kitchen for everything from wings to wraps.
Make-Ahead Tip
Assemble the dip up to a day in advance and refrigerate. When ready to bake, pop it in the oven — just add about 5 extra minutes to the cook time if baking straight from the fridge.
Final Thoughts
This easy, healthy buffalo chicken dip proves that you don’t have to sacrifice flavor to eat lighter. It’s creamy, cheesy, and loaded with protein — perfect for anyone looking for a low carb appetizer or high protein comfort food.
Whether you serve it at your next football party, family gathering, or make it for a quick weeknight meal, this recipe will disappear fast — so go ahead and make a double batch!
Swap out traditional ingredients for a lighter take on this classic dish. This high-protein Buffalo Chicken Dip keeps all the creamy, spicy flavor you love — without the extra fat or carbs.
In a large mixing bowl, combine Greek yogurt, cottage cheese, buffalo sauce, garlic powder, onion powder, and Fiesta Ranch Mix.
Stir in shredded chicken until everything is evenly coated.
Spread mixture in a baking dish and top with shredded cheese.
Bake for 20 minutes, until the cheese is melted and bubbly.
Garnish with chopped celery and serve hot.
Serves 6.
Double the recipe for a larger crowd or big game day gatherings!
Notes
Serve as an Appetizer or a Main Dish
Was this post helpful? I’d love to hear your thoughts! Have you visited Rocky Mountain National Park? What were your favorite hikes, views, or hidden gems? Drop your recommendations in the comments—I can’t wait to hear what made your trip unforgettable!
Fall is in the air, which means it’s time for comfort food and crockpot meals! The season of football and festive gatherings has officially begun. I love the social aspect of this time of year, and I especially love sharing meals with my favorite people that are both delicious and nourishing.
Why I Love This Recipe
Perfect for feeding a large crowd (with plenty of leftovers!)
Rich, hearty flavor—the ultimate comfort food
Packed with lean protein and lots of veggies
Make it ahead and let the slow cooker work its magic
My top priorities in any meal I make are lean protein, plenty of veggies, and bold, robust flavors. This recipe checks all three boxes!
While chili has always been one of my favorite go-to recipes, I decided to play with the flavors and add a Cajun twist. The secret ingredient? Andouille sausage!
This recipe is big on flavor and also flexible. You can swap out protein choices, beans, or veggies and still end up with a wonderful meal. Plus, it’s naturally gluten free!
Recipe Notes
Servings
I made this chili for my Bible study group, so the portions below will feed a large crowd. It’s ideal for football parties, Sunday suppers, or potlucks. Since chili freezes beautifully, it’s also perfect for meal prep.
Protein
I used a mix of lean ground turkey (93% lean) and lean ground beef (96% lean). I love the flavor of beef, but the turkey balances it out by cutting fat and calories. Using lean beef also means you don’t have to drain grease. Feel free to mix and match proteins to suit your taste and nutritional needs.
Beans
For a true Cajun-inspired chili, red beans or kidney beans are traditional. I used what I had in my pantry and loved the mix. A variety of beans adds extra flavor and texture.
Kitchen Tool Spotlight
I’m a big fan of cooking efficiently which means using the best tools. For this chili, a few key items make the process so much easier:
My Lodge cast iron skillet is a total game changer. It heats evenly, holds all the ingredients without crowding, and lets me sauté everything in one pan before transferring it to the slow cooker. Fewer dishes = more time saved!
An adjustable measuring spoon makes measuring spices and ingredients a breeze. The smaller end fits right into most spice jars, which means less mess and fewer dishes.
And of course, a reliable Crock-Pot is a must-have. This one is affordable, easy to clean, and looks great on your counter while it works its magic.
Using these tools together saves time, minimizes cleanup, and helps you create a flavorful chili every single time.
Tanya
Hearty Crockpot Chili with a Cajun Spin | Gluten-Free & Packed with Veggies and Lean Protein
3 16 ozcans beans of your choiceblack beans, pinto, kidney
Salt & pepper to taste
1Tbspchili powder
1Tbspcumin
1Tbspdried oregano
1tsppaprika
1tspcayenne pepper
Equipment
1 Slow Cooker
1 Large Skillet
Method
Instructions
Dice onion, peppers, and carrot. Mince garlic; set aside.
In a large cast-iron or nonstick skillet, sauté the veggies—start with onions, then add carrot, then peppers.
While veggies cook, slice sausage into half-moons.
Transfer sautéed veggies to the slow cooker.
In the same skillet, brown the sausage, then add it to the slow cooker.
In the sausage drippings, brown turkey and beef. Stir in garlic at the end, then transfer to the slow cooker.
Pro Tip:If you have a large Lodge cast iron skillet, you can sauté all your veggies, sausage, and meat at the same time. Total time saver, and less cleanup too!Using an adjustable measuring spoon, measuring spices is quick, precise, and low-mess. Finally, your slow cooker will make this chili effortlessly—my go-to is this sleek Crock-Pot, which is easy to use, clean, and looks beautiful on the counter.
Add canned beans and tomatoes with green chilies to the slow cooker.
Cover and cook for 4 hours on high or 8 hours on low. The longer it cooks, the bolder the flavor!
Notes
Topping Suggestions:
Cilantro
Cheddar
Sour cream
Fresh jalapenos
Green onions
Corn chips
Avocado
Leftovers & Storage
One of the best things about chili is how well it keeps! In fact, I think it tastes even better the next day once the flavors have had more time to blend.
Refrigerator: Store in an airtight container for up to 4 days.
Freezer: Chili freezes beautifully—portion it into freezer-safe bags or containers for up to 3 months. Lay the bags flat in the freezer to save space.
Reheating: Thaw overnight in the fridge, then warm on the stovetop or in the microwave. If it’s a little thick, just add a splash of broth or water.
This makes it perfect for meal prep, busy weeknights, or having a comforting meal ready whenever you need it.
Happy chili cooking! I can’t wait to hear how you like this recipe. Share your beautiful bowls on social media with #savoringmomentsofadventure or leave a comment below.
Was this post helpful? I’d love to hear your thoughts! Have you visited Rocky Mountain National Park? What were your favorite hikes, views, or hidden gems? Drop your recommendations in the comments—I can’t wait to hear what made your trip unforgettable!
Do you ever struggle to spend quality time with God? As Christians, we know that praying and reading God’s Word daily is essential for our spiritual health. We can’t rely only on a 30-minute sermon on Sunday mornings—it’s important to personally pursue intimacy with God. And just like any other close relationship, we must invest time and energy into it.
If you are new or early in your walk with Jesus, this might sound a little strange or even uncomfortable. I totally get it—I’ve been there! But what does intimacy with God really mean?
For clarity, intimacy is a deep and personal relationship characterized by trust, communication, and connection. It’s a relationship where you can be fully known and fully accepted without the fear of judgment or rejection. Doesn’t that sound like a beautiful and healthy relationship you’d want to be part of? I know I do!
So, how do we get there? Here are some practical tips that have helped me tremendously in developing a consistent habit of spending quality time with God:
1. Schedule Your Quiet Time
Add it to your calendar, set reminders, and treat it like any other appointment. You wouldn’t no-show to a doctor’s appointment, right? You schedule it because you know it’s important for your health. In the same way, your “appointment” with God is vital for your soul, so prioritize it.
I recommend spending time with God first thing in the morning, or as early as you can. Personally, I’m NOT a morning person, so the best time for me is right after I get my kids on the bus to school.
2. Start Small and Work Your Way Up
When I first started, I knew it was important to read my Bible and pray, but I didn’t know where to begin. So, I started small—just reading one daily verse.
Even a few minutes with God daily will make a huge impact.
3. Join a Bible Study Group
This is one of my favorite ways to stay consistent. Many churches offer women’s and men’s Bible study groups. They often follow a study guide with homework and short films.
If your church doesn’t have one, you can start a group yourself! Invite 2–3 friends and go through a study together. Groups help you form friendships with other believers, provide accountability, and open up deeper understanding through discussion.
Reading the whole Bible in a year can be intimidating, but there are excellent reading plans out there that provide structure and encouragement.
My favorite is The Bible Recap. It guides you through the Bible chronologically and includes a daily 8–10 minute podcast by Tara-Leigh Cobble, who explains the passages clearly and points to God’s character throughout.
5. Read Your Bible Out Loud
When I first started reading, my mind would wander—I’d think about my to-do list and realize I hadn’t absorbed anything. Reading out loud changed that for me.
It also connects us to the tradition of storytelling used in ancient times when most people couldn’t read. You’ll be surprised at how much better you focus!
6. Minimize Distractions
For me, the sight of dirty dishes or unmade beds was distracting. So, I started doing my Bible study outside with a cup of coffee. Surrounded by God’s creation—the birds, butterflies, and blue sky—I found it easier to worship and focus.
My husband, on the other hand, does his Bible study at the gym right after his morning workout. Find what works best for you—it may take some trial and error.
7. Pray
Prayer looks different for everyone. I like to start my day with gratitude, but I used to fall back asleep while praying in bed—so now I pray right before I open my Bible.
A simple method to start:
One thing you’re grateful for
One thing you need help with
One person to pray for
I also teach this to my kids (ages 6 and 8), and it works wonderfully!
As you grow, you can try the A.C.T.S. method: Adoration, Confession, Thanksgiving, Supplication.
Writing prayers in a journal has also helped me stay focused and see God’s faithfulness over time.
8. Listen to Bible Study Podcasts
Podcasts are perfect for commutes, walks, chores, or workouts. Listening is just as powerful as reading!
Some seasons of life are busier than others. If you only have 5 minutes, don’t set yourself up for failure by aiming for 30. Be consistent, even in small doses, and you’ll build stronger habits over time.
10. If at First You Don’t Succeed, Try Again
Don’t be discouraged if you miss a day—or even a week. Give yourself grace. God knows your heart, and building habits takes time and consistency.
Over the years, my journey has been full of scatter-brained moments, inconsistencies, and failed attempts. But now, my time with God every morning is sacred. I look forward to it, and I notice a huge difference when I skip a day.
One of the key attributes to my success has been praying for God to help me build these habits. Part of my daily prayer is:
“Lord, as I read your Word today, help me have ears to hear what you want to teach me. Give me wisdom and understanding to know you better. Help me have the strength and courage to obey, trust, and surrender to you.”
Although it may seem repetitive, this prayer helps center my thoughts and prepare my heart to receive what God has for me each day.
Remember: it’s about progress, not perfection. Every day is a new opportunity to grow closer to Him.
I’d love to hear from you—what does your quiet time look like? What struggles have you had? Drop a comment below!
Was this post helpful? I’d love to hear your thoughts! Have you visited Rocky Mountain National Park? What were your favorite hikes, views, or hidden gems? Drop your recommendations in the comments—I can’t wait to hear what made your trip unforgettable!
If you’re looking for a quick and healthy dinner that’s bursting with flavor, this Lemon Herb Chicken will become a go-to. It’s a family favorite in my house, and the best part is you can whip it up in about 30–40 minutes. The best part, the oven does most of the work!
This recipe uses just a handful of fresh ingredients, making it budget-friendly and perfect for meal prep. Make a big batch — the leftovers taste even better the next day!
Bright, fresh lemon flavor with lots of herbs: Each bite is bursting with citrusy goodness and aromatic herbs, making this chicken both flavorful and refreshing. Using a mix of herbs allows you to customize the flavor to your liking.
Ready in under 40 minutes: Most of the time is hands-off, letting the oven do the work while you prep sides, set the table, or take a quick break. Perfect for busy weeknights when you want a home-cooked meal without spending hours in the kitchen.
Sheet pan = easy cleanup: No messy pots and pans, no dirty stove top — everything cooks on a single sheet pan. Just line it with foil, bake, and you’re done!
Great for meal prep and leftovers: Make a big batch and enjoy it throughout the week. The flavors actually deepen overnight, making it ideal for packed lunches, salads, wraps, or even a quick risotto.
Healthy and nutritious: A protein-packed, low-carb, moderate-fat meal, it’s full of antioxidants and anti-inflammatory compounds.
Fresh Herbs Make the Difference
The real stars of this dish are the fresh herbs. I love using herbs from my own garden, but store-bought works perfectly too.
In Texas, rosemary and oregano grow year-round, so they’re always part of the mix. In winter, I add Italian parsley and thyme, and in summer, lemon verbena and basil.
You don’t need to be precise here — mix and match what you like. I recommend at least three fresh herbs for the best flavor.
Chicken Thighs vs. Chicken Breasts
For this recipe, I prefer boneless, skinless chicken thighs. They stay juicy, absorb the lemon and herb flavors beautifully, and taste even better as leftovers.
You can definitely use chicken breasts, just be sure to pound them to about ½ inch thickness using a rolling pin or meat tenderizer. This will ensure even cooking. watch your bake time closely to prevent chicken from drying out. Reduce the cook time to about 20 minutes and always use a meat thermometer to ensure internal temperature reaches 165 degrees fahrenheit.
Ingredient Prep
One of the best things about this Lemon Herb Chicken is how simple it is to prep — Here are a few key process photos to help you visualize each step.
Wash Herbs and Lemons and lay out to dry
Layer the lemons in neat rows to create a citrus “bed.” This not only keeps the chicken juicy but infuses it with bright lemon flavor as it cooks.
Place seasoned chicken thighs directly on top of the lemons, then sprinkle with plenty of fresh herbs.
These simple steps set the stage for all that bright flavor!
Once the chicken is in the oven, most of the work is done! Use this time to prep your sides, set the table or snap a few photos for your social media!
Serving Suggestions
This Lemon Herb Chicken pairs beautifully with a variety of sides, making it easy to create a full, flavorful meal:
Roasted green beans or seasonal veggies: Quick, simple, and they soak up some of the lemony chicken juices.
Rosemary potatoes or other roasted root vegetables: Crispy on the outside, tender on the inside — a comforting side everyone will love.
Fresh salads: A crisp lemon Caesar or mixed greens with a light vinaigrette complement the rich flavors of the chicken.
Pasta or risotto: Toss sliced chicken into your favorite pasta or a creamy risotto for a heartier meal.
Fresh sourdough or crusty bread: Perfect for mopping up the delicious lemon-herb juices.
Leftover Ideas
One of the best things about this recipe is how versatile the leftovers are — they taste just as amazing the next day:
Salads and wraps: Chop or shred the chicken and add it to a fresh salad or wrap for a quick lunch or dinner.
Grain bowls: Pair with quinoa, farro, or rice for a balanced, flavorful meal.
Pasta or risotto: Leftover chicken is perfect for tossing into a creamy risotto or a light pasta dish — it adds instant flavor and protein.
Quick reheats: Warm in the oven or microwave for a fast, healthy meal on busy nights.
Tanya
Lemon Herb Chicken
An easy and healthy sheet pan chicken recipe bursting with lemon and fresh herbs. Perfect for weeknight dinners, meal prep, and leftovers!
2tbspfresh herb of your choice: thyme, parsley, basil, or lemon verbena
2tbspextra virgin olive oil
salt and pepper to taste
Equipment
Sheet Pan
Method
Preheat oven to 425°F. Line a sheet pan with foil for easy cleanup.
Slice lemons into rounds and lay them in rows on the pan to create a citrus bed.
Season lemon slices with salt, pepper, and a drizzle of olive oil. Roast for 8–10 minutes to release juices.
While lemons roast, mince fresh herbs and place in a small bowl.
Pat chicken thighs dry and season both sides with salt and pepper.
Remove lemons from oven. Place chicken thighs on top of the lemon slices and sprinkle herbs over both sides.
Pro tip: For picky eaters, use fewer herbs on a couple of pieces to avoid complaints about “too much green stuff.”
Bake chicken for 25–30 minutes, or until internal temperature reaches 165°F.
For serving, place roasted lemon slices on top of chicken. The softened lemons create a fragrant sauce that coats the chicken beautifully.
Notes
Notes
Serving ideas: Pairs well with roasted veggies, potatoes, pasta or a fresh salad.
Leftover tip: Chop into wraps, grain bowls, or toss into risotto for a quick second meal.
Herb flexibility: Feel free to mix and match your favorite fresh herbs — at least three gives the best flavor.
Chicken tips: For breasts, pound to ½ inch thickness and watch cook time to prevent drying.
Final Thoughts
This recipe is simple, versatile, and always a crowd-pleaser. Whether you’re cooking for your family on a busy weeknight or Hosting a large group, it’s one you’ll come back to again and again.
Have you tried this Lemon Herb Chicken? Let me know how it turned out in the comments below! And don’t forget to tag me on Instagram @savoringmomentsofadventure so I can see your beautiful creations.
Was this post helpful? I’d love to hear your thoughts! Have you visited Rocky Mountain National Park? What were your favorite hikes, views, or hidden gems? Drop your recommendations in the comments—I can’t wait to hear what made your trip unforgettable!
Gardening isn’t just about plants—it’s about flavor, family, and a little peace in everyday life. Whether you’re dreaming of fresh herbs for your kitchen, colorful flowers to attract pollinators, or vegetables bursting with flavor, starting your own garden can transform your outdoor space and your meals.
Here’s why I love gardening and why you might too:
7 Reasons Why I Love to Garden
1. Homegrown fruits, vegetables, and herbs taste better Produce from your own garden has a robust flavor that store-bought can’t match.
2. Gardening benefits your body, mind, and soul Time outdoors, digging in the soil, and breathing fresh air leaves me feeling calm and refreshed.
3. Gratitude for God’s perfect design Observing the garden ecosystem reminds me of the beauty in creation and the role we play in nurturing it.
4. Easy access to fresh ingredients Having herbs and vegetables at your fingertips makes cooking easier, more fun, and visually beautiful.
5. Elevate meals effortlessly Fresh ingredients transform everyday dishes from basic to gourmet with minimal effort.
6. A fun family activity Kids love planting, watering, and harvesting, creating memories that last a lifetime.
7. Life lessons that grow with you Gardening teaches patience, persistence, resilience, consistency, and delayed gratification—skills that carry over into parenting and life in general.
Bottom line: A garden is more than soil and seeds—it’s flavor, family, and a little slice of peace in your day.
I’ve made plenty of mistakes in my gardening journey, and I hope this 12-step guide helps save you time, frustration, and money. For a more in depth guide, I recommend this Companion Planting book.
12 Easy Steps to Start Your Own Garden
Step 1: Choose the Perfect Location
Pick a spot with at least 6 hours of sunlight daily. Make sure water is easily accessible. A garden that’s too far away can be neglected, leaving it vulnerable to pests and disease.
Step 2: Know Your Growing Zone
Weather can vary, so find your USDA growing zone to determine the best planting times. Check your zone here: USDA Plant Hardiness Zone Map.
Step 3: Raised Beds vs. In-Ground Gardens
Raised beds: Better control over soil, weeds, and drainage; easier on your back; deters rabbits. Higher setup cost and may need more frequent watering. In-ground gardens: Flexible for space, rich soil with more earthworms, usually less expensive. Harder on your back, more weeds, may need fencing. Tip: Small spaces? Try container gardens or pots.
Step 4: Plant at the Right Time
Most vegetables, fruits, and herbs are annuals. Plant fall/winter crops for cool-weather vegetables and spring/summer crops for warm-weather vegetables. Timing is key for success.
Step 5: Prepare Your Soil
Healthy soil = healthy plants. Amend poor soil with nutrient-rich compost or high-quality soil like Lowe’s organic garden soil. Maintain soil by adding fresh compost or soil every season. Learn how I prepare my garden for fall here.
Step 6: Plan with Companion Planting
Group mutually beneficial plants to naturally deter pests and improve soil nutrients. For example, plant basil next to tomatoes to repel pests. For a full guide, see this Companion Planting book.
Step 7: Support Your Vines
Vegetables like cucumbers, squash, cherry tomatoes, and peas grow on vines. Use a trellis, arch, or teepee for vertical growth and better sun and air circulation. I used arches for melons and cucumbers, and steel wire mesh for a functional and aesthetic trellis.
arches
Trellis
Step 8: Plant Flowers Around Your Garden
Flowers like marigolds deter pests, while others attract pollinators such as bees and butterflies. Strategic planting also improves soil nutrients.
Step 9: Seeds vs. Transplants
Transplants: Tiny plants with roots and sprouts. Higher success and easier spacing.
Seeds: Affordable but slower and less predictable.
Mix both for best results. Planting is a perfect day to involve kids—fun and educational!
Step 10: Water Regularly
Water daily for the first few days, then adjust based on season:
Summer: every other day
Winter: 1–2 times per week
I hand-water to stay connected with my garden and monitor plant health, but sprinklers or drip irrigation also work.
Step 11: Manage Pests Naturally
Distinguish good bugs (bees, butterflies, ladybugs, dragonflies) from bad bugs (aphids, caterpillars, slugs, snails, cutworms).
Enjoy the fruits of your labor! Experiment with recipes, take risks, and savor the flavors of your garden. Ask yourself daily: “What can I use from my garden today?”
Although gardening may seem time-consuming, with a little planning, patience, and consistency, you’ll learn to love the process of growing your own food.
Happy gardening! Do you have a home garden? Share your journey in the comments or send me your questions—I’d love to hear from you!
Was this post helpful? I’d love to hear your thoughts! Have you visited Rocky Mountain National Park? What were your favorite hikes, views, or hidden gems? Drop your recommendations in the comments—I can’t wait to hear what made your trip unforgettable!
Perfectionism can feel like a constant battle—whether at work, at home, or even in the simplest of hobbies. I know this struggle well. Recently, our family of four was gifted a paint-by-numbers kit.
If you’ve never heard of paint by numbers, it’s a clever and foolproof way to create a pretty picture by simply matching paint colors with corresponding numbers on a canvas. Each of us had a different design, mine being the most challenging.
As we started the project, I was blissfully enjoying every stroke of my paintbrush as I carefully filled in the background and larger sections of my picture. The rest of my family finished their entire painting, while I took my time, meticulously ensuring that the designated colors stayed perfectly within their lines.
As I moved on to some of the more intricate details, my strategy to stay in the lines grew burdensome, and I was no longer enjoying the process. I felt tired, frustrated, and ready to call it quits. I reminded myself that this was supposed to be fun, so I put down my paintbrush and decided to finish the painting tomorrow.
The next day, while my family enjoyed Sunday football, I picked up my paintbrush again, determined to finish what I had started. Once again, I obsessed over staying in the lines, which became more and more challenging as I approached the tiny details. When I finally finished the painting, I looked at it in confusion.
I had followed the instructions to a tee. I accomplished my mission of staying within each line. My painting looked just like the sample picture. But instead of feeling successful, I felt let down.
I was disappointed that I didn’t allow myself to enjoy the process more—that I was so fixated on staying in the lines that I failed to observe the bigger picture. And ultimately, my painting looked just like everyone else’s who did this kit.
It was then that I embraced the freedom of painting outside the lines. I picked up my brush again and began to paint with curiosity, playfulness, and ease. I no longer felt stressed—I felt free to be creative, to make mistakes, and to enjoy the process. It was a gentle reminder that a perfectionist mindset has the danger of limiting creativity and stealing joy.
The Positive Side of a Perfectionist Mindset
Not all characteristics of perfectionism are negative. On the contrary! People with a perfectionist mindset often tend to be efficient, detail-oriented, hard-working, self-disciplined, responsible, organized, and full of integrity.
When properly channeled, a perfectionist’s drive can make a huge impact on the world—think Steve Jobs! When a perfectionist is in a healthy state of mind, they can spot problems and create solutions to make things better or more efficient.
The world needs perfectionists! Think of surgeons, engineers, architects, accountants, and pilots. Wouldn’t you want these people to make sure every part of their job is done meticulously and to the best of their ability? I know I would! So why do perfectionists tend to get a bad rap?
The Struggles of a Perfectionist Mindset
To paraphrase from The Road Back To You: An Enneagram Journey to Self-Discovery, authors Cron and Stabile discuss the struggles among perfectionists. They often have high expectations of themselves, fixate on small imperfections, believe their way is the best (or only) way to get the job done, are extremely self-critical, struggle with comparison, and feel terrified of making mistakes. Yikes.
I confess that I can identify with both the positive and negative sides of perfectionism. And I know I’m not alone.
So what can we do to stay on the healthy side of perfectionism and not fall prey to the downward spirals mentioned above?
Reflective Questions to Overcome Perfectionism
Am I burdened or stressed because I’m setting unrealistic standards for myself and others?
Am I obsessing over the small imperfections and missing the bigger picture?
Am I constantly micromanaging, re-doing other people’s work, or refusing to delegate because I’m convinced that my way is better?
Is my inner monologue harshly self-critical? Do I feel like if I don’t do things perfectly, I’m a failure?
Am I trying to prove my worth through performance?
Do I compare myself to others and struggle with self-worth?
Does my fear of failure hinder me from making a decision or trying something new?
Am I angry at others for “not doing their part” or “not doing it as good as me”?
When I reflect on these questions, I can see both where I’ve experienced growth and where I still need work. My next step is always to seek truth from the Bible and stand firm on God’s direction and instructions.
What the Bible Says About Perfectionism
While the Bible doesn’t use modern phrases like “perfectionism,” it does give us principles that apply directly to this struggle.
Ephesians 2:8-9 – “For it is by grace you have been saved, through faith—and this is not from yourselves, it is the gift of God—not by works, so that no one can boast.” → My salvation is not based on my performance. There is nothing I can do to earn God’s favor. His love is a gift of grace.
2 Corinthians 12:9 – The Lord says, “My grace is sufficient for you, for my power is made perfect in weakness.” → God uses our weaknesses to demonstrate His power. If we were perfect, we wouldn’t need Him.
Ephesians 2:10 – “For we are God’s handiwork, created in Christ Jesus to do good works, which God prepared in advance for us to do.” → God did not create me to be perfect. He created me in His image, with value, order, integrity, and beauty. I am His masterpiece—created to do good works here on earth.
7 Mindset Shifts to Let Go of Perfectionism
When I drift toward the weight of perfectionism, these mindset shifts help me return to what matters most—love, balance, and grace.
I can set goals, work hard, and pursue progress over perfection.
I can choose to love myself and others by not sweating the small stuff.
I can delegate, release control, and trust others to contribute.
I will applaud my efforts and give myself grace when I make mistakes.
I will not let comparison steal my joy—I am God’s handiwork, I am unique.
It’s not my responsibility to “fix” everything—I can use my gifts to make positive change.
I will not let the fear of striking out keep me from playing the game.
Conclusion: Progress Over Perfection
Looking back at that paint-by-numbers kit, I realize the picture was never meant to be perfect—it was meant to be enjoyed. Life works the same way. If we stay trapped inside the lines of perfectionism, we risk missing the beauty, creativity, and joy God intended for us. But when we allow ourselves to step outside those lines with grace, we discover freedom, growth, and peace.
Perfectionism whispers that we’ll never be enough, but God’s Word reminds us that in Christ, we already are. My hope is that as you reflect on these mindset shifts, you’ll let go of perfectionism and embrace the peace of progress, grace, and growth. You are God’s masterpiece—not because you are flawless, but because you are His.
Step outside the lines—you might just find the masterpiece God has been painting all along.
Was this post helpful? I’d love to hear your thoughts! Have you visited Rocky Mountain National Park? What were your favorite hikes, views, or hidden gems? Drop your recommendations in the comments—I can’t wait to hear what made your trip unforgettable!
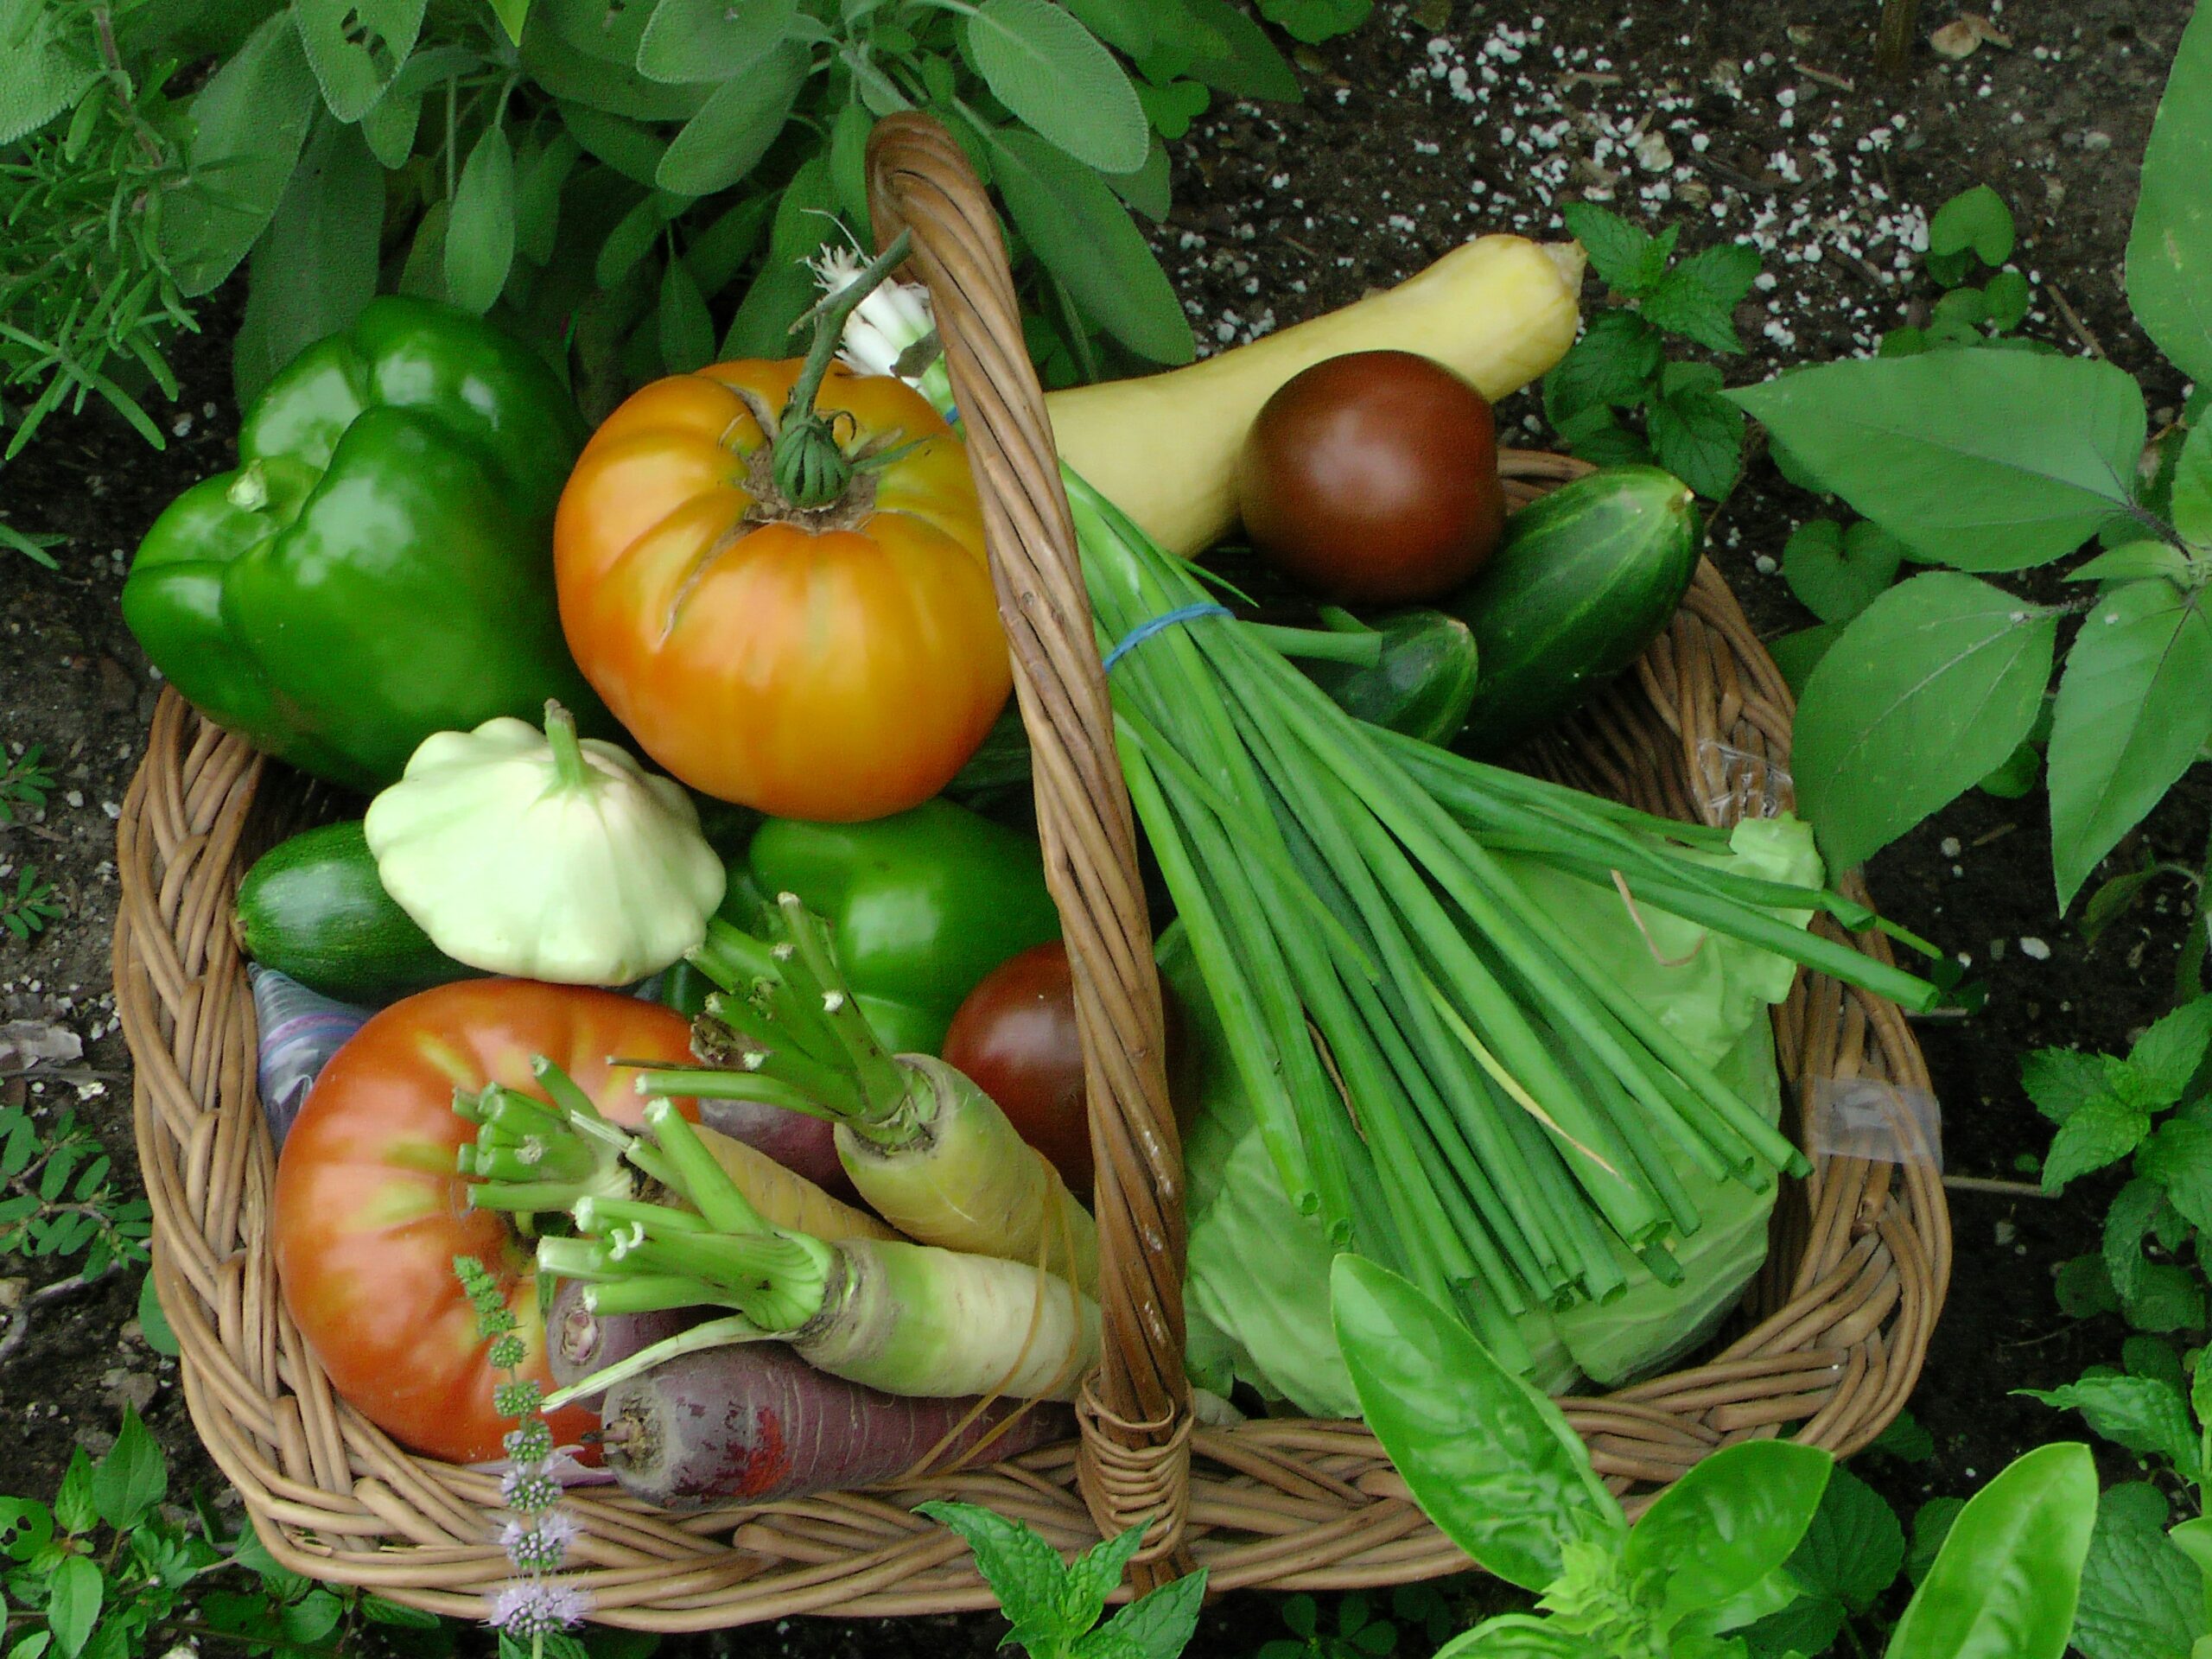
Out with the Old, In with the New: Creating Space for Fall
September is one of my favorite transitional months. The days start getting shorter and the anticipation for fall creates excitement and eagerness for the season ahead. While fall may still feel like a dream on those 95-degree afternoons (this is Texas after all), it’s clear that the seasons are changing. The early mornings are crisp with cooler air and our garden is already telling us it’s time to shift gears.
After months of battling relentless heat, our summer veggies have finally had enough. The watermelon vines have completely taken over, the peppers have slowed to a crawl, and the cucumber vines are more brittle than bountiful. It’s no surprise, Texas summers are no joke! But seeing the garden wither under the brutal heat of so much sun always tugs at our hearts a bit.
Still, this moment of transition is one we embrace. Because even as we pull up the last of the sizzled plants and sweep away wilted stems, we know: it’s not the end. It’s a new beginning. We say goodbye to the vines that gave us so much through the summer months to make space for what’s coming.
Together as a family, we roll up our sleeves and dive into the dirt—revamping our garden beds, refreshing the soil, and dreaming up what fall will bring. Out with the old, in with the new. There’s something incredibly grounding about this process, and even more so when we do it as a family.
For the kids, it’s a playground of possibility. Dirt turns to treasure as they uncover worms, giant grasshoppers, and leaping lizards. Gloves are optional. Dirty fingernails are a must. Getting dirty is half the fun, and every weed they pull or row they help clear becomes part of the experience. It’s messy, yes—but it’s also magic.
We’ve learned that gardening creates valuable teaching moments—about nature, responsibility, patience, and change. It also teaches us joy as we discover the perfect ecosystems put in place by our creator, and the role he has given us to work and tend to the land. These moments root our children not just in the soil, but in something far deeper: gratitude, stewardship, and awe.
When we finish a hot afternoon of garden cleanup, there’s always a reward waiting: icy popsicles and a run through the sprinklers—laughter echoing as the sun dips just a little earlier in the sky.
As we prep the beds for cooler weather, we’re excited to welcome a new season of planting. This fall, we’ll be growing: 🌿 Kale, spinach, lettuce 🥕 Carrots, beets, radishes 🥦 Broccoli 🫘 Snap peas and snow peas 🌱 Cilantro, parsley, dill, and chives
I’m especially looking forward to harvesting these fresh ingredients and using them in some of my favorite fall recipes—from warm soups and roasted veggie bowls to crisp garden salads with fresh herbs straight from our backyard! There is nothing more rewarding!
Gardening in Texas isn’t always easy. The heat tests us, the bugs test us, and the soil can be stubborn. But it’s also where we grow the most—not just in what we plant, but in how we connect.
So as we clear away the remnants of summer, we’re not just making space in our raised beds—we’re making space in our lives for what’s next. The fall garden may be more modest than summer’s wild abundance, but it’s rich with potential. And the best part? We’re doing it together.
Here’s to sun-soaked days, dirty hands, garden-to-table meals, and the promise of something new. Happy fall gardening, y’all!!! 🌿🍂🍧
What are you planting in your fall garden? Share in the comments below!
Was this post helpful? I’d love to hear your thoughts! Have you visited Rocky Mountain National Park? What were your favorite hikes, views, or hidden gems? Drop your recommendations in the comments—I can’t wait to hear what made your trip unforgettable!
Rest, Reconnect, Reflect. How 7 days away makes us stronger all year long!
Since having kids, my husband and I have made it a priority to get away—just the two of us—at least once a year. My love language is quality time, so uninterrupted moments with my husband really fill my love tank. The focus of this time is simple yet powerful: to rest, reconnect, and reflect.
To be clear, this getaway doesn’t need to be extravagant, expensive, or even very long. The purpose is to silence the noise of the daily grind and take a break from the weight of life’s responsibilities. Whether it’s a staycation close to home or a splurge on a dream destination, this annual retreat fills my soul. We plan and budget for it in advance, and it’s one of the things I most look forward to each year.
If you’re a parent, you know that arranging childcare can be one of the biggest hurdles. We’re incredibly grateful to have both sets of grandparents who generously step in to watch our kids. If family isn’t an option for you, consider partnering with a close, trusted friend—ideally someone whose kids are similar in age to yours—so you can take turns supporting each other. Start small—maybe with just an overnight stay—and work your way up to longer trips as your kids get older and more comfortable being away.
Our getaways usually include time in nature, delicious food, a new adventure, and some much-needed relaxation.
Here are a few ideas to help you plan your own couples’ retreat:
1. Take Care of BusinessEarly
We always seem to have some “business” to discuss—whether it’s finances, parenting, logistics, or future plans. And yes, these conversations can lead to tension. That’s okay! It’s part of being two different people with different ideas doing life together.
I’m not a proponent of avoiding hard conversations, but I do advocate for getting them out of the way early. Sometimes we have the tough talks en route to the airport or while sitting on the plane. I find it helpful to lay all the cards on the table, work through it, and move forward with clarity.
I’m grateful that my husband and I are both natural problem-solvers. Over the years, we’ve learned how to compromise and understand each other’s perspectives. But that skill takes time—and lots of practice.
2. Rest
There is so much to take care of on a daily basis. My husband is in a demanding leadership role in corporate America, and I’m a stay-at-home mom, focused on raising kind, hardworking, responsible humans while keeping our household running smoothly. Between work, kids, activities, health, meals, home maintenance, and community service—it’s a lot.
That’s why rest is crucial.
Rest looks different for each of us. Nate loves spending an extra hour at the gym, enjoying an unrushed workout. For me, rest means embracing the Italian concept of dolce far niente—the sweetness of doing nothing. Having time when I’m not a mom, maid, chef, teacher, or therapist is essential.
Thankfully, Nate and I share similar vacation interests: a healthy mix of relaxation and adventure. No matter what rest looks like for you, carve out time to step away from responsibility. Silence the noise, pause the mental checklist, and be still. Easier said than done, right? It takes me a few days to truly unwind—which is why we usually plan for 5–7 days. But I promise you, the benefits are so worth it.
3. Reconnect
Life gets busy. Without intentionality, it’s easy to slip into a “roommate” dynamic in marriage. This trip is our time to rekindle the love, friendship, and passion we shared in the early years.
While we try to do weekly date nights, extended time away deepens our connection on a whole new level. After 11 years of marriage and many seasons of change, this trip always reminds us how much we enjoy each other’s company. Emotional intimacy often leads to greater physical intimacy, so—everyone wins! 😉
Investing in our marriage makes us stronger as a couple and better as parents. After each trip, we return with a shared vision and a renewed sense of unity.
4. Reflect
Once we’ve rested and reconnected, I like to take time to reflect—on how I’m doing personally, how we’re doing as a couple, and how our kids are growing.
I think about our mistakes, what we’ve learned, and how we can grow from those lessons. Reflection helps me recognize patterns—both good and bad—and course-correct when needed. We also take time to celebrate what we’ve done well and acknowledge the progress we’ve made.
This is when we re-align our goals and make sure we’re still moving in the same direction. Stepping back gives me clarity on blind spots that might be holding us back, and helps me move forward with intention.
On our way home, we always feel refreshed, grateful, and more in love than when we left. There’s a deep sense of rejuvenation—mentally, emotionally, and physically. Dare I say… we even feel younger?
With well-rested bodies, new memories, and full tummies, we return ready to embrace whatever the next season holds.
I hope this inspires you to plan your next trip with your spouse!!!
Destination Ideas from previous trips:
Maui, Hawaii
Cancun, Mexico
Puerto Vallarta, Mexico
Grand Cayman Island
Sarasota, Florida
Estes Park, Colorado
Austin Hill Country
San Antonio, Texas
Santa Barbara, California
San Diego, Califoria
Sedona, Arizona
Belize
What do you love to do on vacation with your loved one? Share in the comments below!
Was this post helpful? I’d love to hear your thoughts! Have you visited Rocky Mountain National Park? What were your favorite hikes, views, or hidden gems? Drop your recommendations in the comments—I can’t wait to hear what made your trip unforgettable!
It’s always bittersweet as summer comes to an end. I’ve found that two completely different emotions can co-exist at the same time. The kids and I are feeling both sad and excited. We’ll definitely miss the slow mornings, the flexible days, and the freedom to go with the flow.
But with a new school year comes the eagerness for routine, fresh goals, and embracing the growth of a new season.
Back To School Party
One of our favorite traditions is hosting a Back to School Party the day before school starts. It helps all of us focus on the positive things ahead and set our minds on new ambitions.
Pursuing personal growth is a big part of our family values. We don’t just encourage our kids to set goals—we all participate! As a family, we break down our goals into three main categories: Body, Mind, and Soul.
Body, Mind, and Soul Goals
Body 💪
This is all about health and physical growth—and it’s usually the most exciting category for the kids! Some of our past goals have included:
Moving up two belts in Taekwondo
Mastering a push-up with great form
Improving speed or strength
Perfecting a cartwheel
Drinking more water
Going to bed earlier
Basically, anything that gets us moving and growing stronger!
Mind 📚
This one’s about expanding our knowledge and brain power. For the kids, this usually means hitting academic milestones. For example, one year, my kindergartener’s goal was to be reading by the end of the year. For my husband and me, our “mind” goals usually involve reading more books, listening to podcasts, or diving into personal development. This year, my goal is learning how to create an engaging blog that helps and inspires others.
SOUL ✨
This is focused on our spiritual growth. As Christians, we always want to grow closer to God. This is my favorite category, because I believe spiritual growth permeates every other part of life.
Some soul goals we’ve had:
Creating a consistent prayer routine
Reading the Bible chronologically
Letting go of fear and anxiety to trust God more
Finding ways to serve others as a family
Make the Goals Attainable—and FUN! 🎯
The key is to make goals challenging but realistic. And to plan a path toward them.
One goes in a time capsule, opened at winter break.
The other stays in our bedrooms as a daily reminder to stay focused and work hard
At winter break, we track our progress and make adjustments. Then we open the time capsule again on the last day of school and celebrate our victories with another party! 🎉
Keep the Party Short + Sweet
Our kids are 6 and 8, entering 1st and 3rd grade. As much as I’d love to have deep, hour-long goal-setting conversations, this is still a party—so we keep it light and fun.
In the weeks before, I like to start planting little seeds to help them brainstorm:
“I wonder what you’ll be able to do by the end of the year that you can’t do now?”
“Can you imagine how much stronger you’ll be in 10 months?”
“Do you think you’ll learn to ride a bike with no training wheels this year?”
“How much more do you think you’ll know about God by your next birthday?”
These simple questions get their minds thinking in the right direction so they’re ready when it’s time to set actual goals.
More Party Tips!
To make it extra special:
Decorate like you would for any party
Let the kids choose the food + dessert, this little gift of autonomy makes our kids jump for joy!
Give small gifts (pro tip: wrap things they already need for school—it feels extra exciting to open presents!)
Some of our favorite back-to-school staples:
Bentgo Lunch Boxes
Pottery Barn Backpacks & Lunch Bags
Simple Modern Water Bottles
Nike Tennis Shoes
Cheeky Plum Dresses for the First Day and Picture Day
And don’t forget the Back to School Menu download HERE! 🍽️
Wrap it all up with dessert, music, and a few games. The more fun this celebration is, the more excitement your kids will feel about starting school and working toward their goals.
What Are Your Back-to-School Traditions?
I’d love to hear how your family prepares for a new school year! Share your ideas in the comments below 👇
Let’s make this school year one of growth, joy, and purpose—together! 💛
Was this post helpful? I’d love to hear your thoughts! Have you visited Rocky Mountain National Park? What were your favorite hikes, views, or hidden gems? Drop your recommendations in the comments—I can’t wait to hear what made your trip unforgettable!
Stand in awe and wonder with crisp mountain air, rushing rivers, and breathtaking views!
Everything You Need to Know to Plan a Great Trip
Why RMNP Should Be On Your Family’s Bucket List
Magic lives in the Colorado mountains! We were invited to a wedding in Estes Park years ago and quickly realized how the natural beauty of this land takes center stage. Towering peaks, pine scented air, and majestic views left us completely enamored. As we stood there taking it all in, we knew one thing for sure—coming back with our kids would definitely be on our bucket list! There are endless opportunities for outdoor family fun—from hiking and fishing to scenic drives, wildlife spotting, and exploring the area’s diverse topography and ecosystem—there’s truly something for everyone!
This summer, we finally made it happen. With backpacks packed and hearts full of excitement, we set out on our long-awaited family adventure to Rocky Mountain National Park. Here’s what we learned from exploring the Rockies—our best tips and tricks from our family to yours.
Trout FishingAlluvial Falls
Know Before You Go
Timed Entry and Park Pass
How It Works
Time entry reservations are required to enter RMNP from May to October between 9am and 2pm. Reservations are released on the 1st of every month for the following month. We visited in June so we had to make our reservations on May 1st. Set multiple alarms for 8am mountain time, these reservations go QUICK! Not able to make a reservation? Not all hope is lost! You can still enter the park either before 9am or after 2pm. But beware, the lines to enter can be long and time consuming. In addition to your timed entry, you will also need to purchase a park pass. There are several options ranging from $15 for a daily pass, $35 for a 7 day pass, and $70 for an annual pass. Military and seniors get some pretty great discounts!
Once you’ve purchased your pass and timed entry, I highly recommend downloading the Recreation.gov app. It provides quick access to your pass and timed entry QR codes, which you’ll need to show park rangers upon arrival. For added convenience be sure to add the QR codes to your digital wallet, especially since cell reception can be spotty in the mountains.
RMNP is Divided Into 2 Distinct Regions
Beaver Meadows/Fall River and Bear Lake
The most popular is the Beaver Meadows and Fall River entrance, located closest to Estes Park. This entrance gives you access to many of the must see attractions including Trail Ridge Road, Alluvial Falls, Hidden Valley (Junior Ranger Headquarters and only clean flushing toilets in the park) Alpine visitors center, and much more! The Junior Ranger Program is a great way to get kids excited about exploring the park. Pick up a Junior Ranger activity book, join in on the daily activities, and earn an official Junior Ranger badge—a memorable and meaningful souvenir of your visit!
On the opposite side of Estes Park lies the Bear Lake Road Corridor, which provides access to Bear Lake, Glacier Gorge, and a variety of scenic lakes and waterfalls. Parking lots fill up quickly, so I highly recommend using the free Park & Ride shuttle service, which operates daily from 6:30 a.m. to 7:30 p.m. Bear Lake offers an easy, paved, and flat loop—perfect for strollers and toddlers. From there, we hiked up to Nymph Lake and Dream Lake (about 2.2 miles round trip). While this trail was a bit more strenuous, our kiddos powered through—and it ended up being our favorite hike of the entire trip!
Pack For The Elements
UnpredictableWeather
The weather in Rocky Mountain National Park can be highly unpredictable, so it’s best to plan ahead. During the summer months, mornings are often cold and crisp, with temperatures in the 50s. By midday, the sun usually warms things up quickly, with highs reaching the mid to upper 80s. I recommend dressing in light layers and always packing a rain jacket—storms can roll in quickly and without warning.
One day, we started our hike under sunny skies and 80-degree temps. Suddenly, a storm moved in, bringing heavy rain and even hail! Within minutes, the temperature dropped back down into the 50s. It was a wild change!
Also keep in mind: the higher you go, the cooler it gets. While it might be sunny and warm at the park entrance, temperatures can be significantly colder as you climb Trail Ridge Road toward the Alpine Visitor Center
Comfortable, water-resistant shoes, a breathable backpack, plenty of water, and snacks are absolute must-haves for a day in the park!
Altitude Awareness
Prevention is Key
To stay ahead of altitude sickness, be sure to stay well hydrated, avoid alcohol on day one, and allow time to acclimate before heading to higher elevations.
We found it helpful to work our way up the mountains gradually, starting with lower elevation hikes and scenic stops before tackling the higher viewpoints.
We also had great success with motion sickness bands—the kind you might use for long car or boat rides. I discovered these tiny miracle bands when I was pregnant and desperate for a remedy for my morning sickness. Surprisingly, they worked well for managing altitude-related symptoms, especially for our kids during winding drives up the mountain. Now, we never go on a trip without them!
While You Are There
Book a Guided Tour
Green Jeep Tour
We opted for a private group tour with Green Jeep Tours, and it was the perfect choice for our group of 8 adults and 3 kids—all with different fitness levels and mobility needs. This option allowed us to explore the park together comfortably, and it made it possible for those with limited hiking ability to still experience the park’s incredible sights and scenery.
Our guide, Fritz, was incredibly knowledgeable, friendly, and attentive to all of our needs. He came fully prepared—with bathroom stop plans, snacks, blankets, a portable heater, and even insights on spotting wildlife. Fritz handled the unpredictable mountain weather with ease and answered all of our questions with detail and enthusiasm. He truly made our experience unforgettable. This excursion was absolutely worth every penny!
The Estes Park Aerial Tramway offers a peaceful 5-minute ride from Estes Park up to Prospect Mountain (8,900 ft). At the summit, enjoy spectacular 360° views of Estes Park, the Rockies, and the Continental Divide. You’ll also find a short hike, café, gift shop, clean restrooms, and picnic tables with stunning views.
This ride is wheelchair and stroller accessible, making it great for families and all mobility levels.
Tips:
Visit on a weekday to avoid crowds. Book reservations ahead of time.
Arrive at 8 a.m. or later in the afternoon for shorter lines.
Dress in layers and bring sunscreen and a rain jacket—weather can change fast!
Tickets range from $20–$38 per person, with kids under 5 free! There are many discounts available. Be sure to check out their website for more info at https://estestram.com/
Take Advantage of The Junior Ranger Program
Learn, Explore and Earn Your Badges
The Junior Ranger Program is a fantastic way for young explorers to get excited about learning while exploring Rocky Mountain National Park. Stop by any visitor center to pick up a free Junior Ranger activity booklet, then complete activities, earn badges, and get officially sworn in as a Junior Ranger. Our kids LOVED earning their badges!
The Junior Ranger Headquarters, located at Hidden Valley, is open daily from 9 a.m. to 4:30 p.m., offering hands-on programs and discovery stations. We loved the Junior Angler fishing experience and activities where our kids learned about local plants, trees, and wildflowers.
We were amazed by how many wild animals we saw—both near and far! Elk and deer were the most common; we spotted them every day, even wandering through town! One morning, we watched in awe as an elk grazed through the river just outside our cabin. Its antlers were absolutely majestic—a moment we’ll never forget! We also had the thrill of seeing a moose, a curious marmot, and even a bat! Wildlife sightings were truly one of the highlights of our trip. Always keep a safe distance from wild animals. Park rangers recommend staying at least 25 yards away.
More Adventures You Won’t Want to Miss
The Stanley Hotel & Estes Village
The iconic Stanley Hotel is where history meets luxury. Best known as the inspiration for Stephen King’s The Shining, the hotel offers more than just elegant accommodations—it also features guided tours, live shows, and world-class dining. I highly recommend stopping by to admire the stunning architecture and enjoy a delicious meal in a truly unforgettable setting.
Estes Village is a charming mountain town at the heart of Estes Park. You’ll find cozy cafés, local restaurants, wine bars, and craft breweries—plenty to satisfy any palate. It’s also the best place to shop for souvenirs, with many stores offering handmade, locally crafted goods you won’t find anywhere else. The atmosphere is casual, inviting, and family-friendly—making it a perfect spot to unwind after a full day of adventure in RMNP.
Where We Stayed
River Stone Resorts and Bear Paw Suites
These cozy cabins were in a fantastic location—just 10 minutes from the Beaver Meadows entrance to RMNP and 6 minutes from Estes Village. Nestled along the peaceful Fall River, they provided the perfect setting for sipping coffee in the morning or enjoying a glass of wine in the evening.
Because this trip was a family reunion, we had several families staying at the resort. The cabins offered the best of both worlds: close proximity to our loved ones, with just enough privacy to enjoy some quiet time alone.
We were warmly greeted by the owners—a friendly couple who went out of their way to make us feel welcome. They even provided fishing poles, which led to an unforgettable memory: our son catching his first trout!
Each cabin came with a full kitchen, perfect for quick breakfasts and trail-ready lunches. Our unit had a master suite, kitchen, and living room downstairs, plus a loft and full bathroom upstairs—an ideal setup for our family of four.
We truly loved our stay here and would definitely come back again!
Anytime you see a line, you know the food is exceptional. Our breakfast here was nothing short of outstanding and most definitely worth the wait! Hubby and eye especially enjoyed the fresh juice bar with our meal.
We LOVED the setting of this coffee shop. It was nestled right along the rocks where you can enjoy an alfresco breakfast while watching the ducks swim and play. Our kids enjoyed the playful atmosphere while we enjoyed the delicious coffee!
Other restaurants that come highly recommended by local friends:
This was hands-down everyone’s favorite meal of the trip. Featured on Guy Fieri’s Diners, Drive-Ins & Dives, this restaurant lives up to the hype. The food is absolutely outstanding—combining classic favorites with creative, unexpected twists to deliver a true culinary masterpiece. I highly recommend grabbing a seat outside to take in the spectacular mountain views while you dine. It’s open for lunch and dinner M-F, and brunch on Sat & Sun.
We arrived in Estes Park just in time for lunch and needed a quick, satisfying bite before checking into our cabin. Rocky Mountain Deli was the perfect stop. They use high-quality ingredients, and our sandwiches were absolutely delicious—fresh, flavorful, and exactly what we needed to kick off our trip
We enjoyed a delicious family meal here. The staff was friendly, flexible, and accommodating to our party of 11, which made the experience even better. I highly recommend making a reservation, as it does get busy—especially during peak times. If the weather allows, the patio is the perfect spot to enjoy the views and a cool mountain breeze. The indoor dining area can get a bit hot and noisy, so outdoor seating is definitely worth requesting
If you’re looking for a fine dining experience, look no further! Twin Oaks was another crowd favorite! This restaurant boasts breathtaking views, exceptional service and exquisite food. The dining room has beautiful rustic decor and live music that blends beautifully into the background, providing a warm upscale atmosphere. Our party sampled several dishes, including the filet mignon, rack of lamb, the fresh catch fish, and the prime rib. They were all phenomenal! Even the kids enjoyed their entrees! I’d easily give this spot a 10/10! Reservations are highly recommended.
Was this post helpful? I’d love to hear your thoughts! Have you visited Rocky Mountain National Park? What were your favorite hikes, views, or hidden gems? Drop your recommendations in the comments—I can’t wait to hear what made your trip unforgettable!
Was this post helpful? I’d love to hear your thoughts! Have you visited Rocky Mountain National Park? What were your favorite hikes, views, or hidden gems? Drop your recommendations in the comments—I can’t wait to hear what made your trip unforgettable!